[DEPRECATED] Access Aave on Ledger Vault
This section is for Operators only.
Overview
This section describes how to lend crypto and earn rewards in Ledger Vault via Aave.
Aave is a decentralized non-custodial liquidity market protocol where users can participate as suppliers or borrowers. Suppliers provide liquidity to the market to earn a passive income, while borrowers are able to borrow in an over collateralized (perpetually) or undercollateralized (one-block liquidity) fashion.
You can learn more about lending crypto assets with Aave here.
Before you begin
You need to be Creator on at least one smart contract governance rule to have access to the Vault DApps. If not, reach out to your Administrators to request it.
Step-by-step guide
- In your Ledger Vault workspace, click on the DApps section in the sidebar.
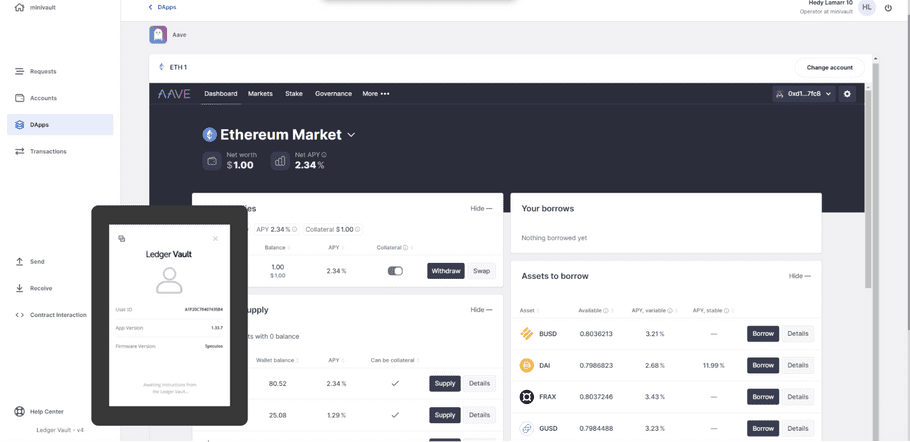
- Select the Aave DApp. You will lend in the Dashboard section.
- At the top-left corner, select the account you want to use.
- Head to the ‘Assets to supply’ section. Here, browse to the "Supply" section and click on "Supply" for the asset you want to supply.
- Select the amount you'd like to supply and submit your transaction. Note that the first supply of one asset will require an additional approval transaction.
- Review your transaction on the Confirmation modal. Note that you can go back to previous steps up to the Fees selection, should you want to adjust the speed or add a Title & Note. Once you have reviewed your transaction details, click Confirm .
- Review the transaction on your PSD and click on Confirm if it matches your intent.
- When your transaction succeeds, you will see your deposited balance in Aave’s interface, which should appear at the top of the Supply section under ‘Your supplies’ .
How to withdraw assets deposited on Aave
- In the Dashboard section, you should be able to visualize your deposited assets under ‘Your supplies’. Click on “Withdraw” for the assets that you wish to claim.
- Select the amount to withdraw
- Review your transaction on the Confirmation modal. Note that you can go back to previous steps up to the Fees selection, should you want to adjust the speed or add a Title & Note. Once you have reviewed your transaction details, click Confirm .
- Review the transaction on your PSD and click on Confirm if it matches your intent.
